GetVirtual – Virtualization 4 All

My vision what Microsoft Virtualization and Cloud Computing bring to IT World

Installing and running Hyper-V 2012 R2 from a USB stick

Hyper-V 2012 R2 Server is the free version of Hyper-V and it offers all the components and features that are available in Windows Server 2012 R2 with Hyper-V. It is a Windows version containing only the Hyper-V bits and the Windows Failover Cluster, but it has to be installed as any other Windows Server on the local hard disk.

What if you could run Hyper-V 2012 R2 Server from a USB stick, allowing you to take it wherever you go in your pocket, making your Hyper-V 2012 R2 available on any computer through a USB boot? It will come in very handy when you need a Hyper-V ready for a test environment or even just to run your virtual machines and bring all of them with you on a USB stick.

How it works?

Almost the whole process to create the USB stick with Hyper-V 2012 R2 is done via commands.

1. The first thing was to create a new VHDX file and enable it to receive the Hyper-V 2012 R2 image by creating a primary partition and formatting it using NTFS.

2. Then, by using the DISM tool, you actually apply the Hyper-V 2012 R2 Server image that is in the Install.wim file to the VHDX file mounted on the R drive.

3. After that, the USB flash drive was prepared and formatted via Diskpart. The VHDX file containing the Hyper-V 2012 R2 image was copied onto it and it was configured with the boot configuration using the BCDBoot tool.

4. The last commands removed the paging file to improve the USB stick performance.

5. That’s it. In the first USB boot, you will have to finish the Hyper-V 2012 R2 Server installation process.

I use this option for all my sessions when I want to demonstrate the features and how powerful is Hyper-V 2012 R2. My daily desktop is Windows 8.1 Enterprise (with hyper-V enable). It’s not recommend to have this installation on any other server that you may use for production environment or even for any other environment that will request sensitive data (like Testing).

Requirements

To run Hyper-V 2012 R2 from the USB stick, you need at least an 8 GB flash drive. The computer which is to run the Hyper-V needs to support boot from USB and the Hyper-V pre-requisites. In this casa I use a 24 GB USB 3.0 stick.

To create the USB stick with Hyper-V on it, you need to download and install the Windows Automated Installation Kit (WAIK) for Windows 8.1 or a newer version, on the computer that will be used to perform this recipe. The WAIK for Windows 8.1 can be downloaded from the following link:

http://www.microsoft.com/en-ca/download/details.aspx?id=39306

You will also need to install .NET Framework 4.5 and download Microsoft Hyper-V Server 2012 R2 from the Microsoft website. Open the Hyper-V Server image file that you downloaded, navigate to the Sources folder, and copy the Install.wim file to a local folder on your computer.

How to install Hyper-V 2012 R2 Server on USB Stick

The following steps will show how to prepare a USB flash drive to create a bootable version of

Microsoft Hyper-V 2012 R2 Server.

1. Open the command prompt as an administrator to create the VHDX file that will be used to add the Hyper-V image on the USB stick.

2. Run the following commands to create a folder named HYPVBOOT and the VHDX file named HYPV2012R2.VHDX with 6 GB capacity. The command will also attach the VHDX as the local letter R.

mkdir c:\hypvboot

diskpart

create vdisk file=c:\hypvboot\HYPV2012R2.vhdx maximum=6000 type=fixed

select vdisk file=c:\hypvboot\ HYPV2012R2.vhdx

attach vdisk

create partition primary

assign letter=r

format quick fs=ntfs label=HYPV2012R2

exit

3. After creating the VHDX file, you can apply the Hyper-V 2012 R2 Server image using the INSTALL.WIM file. From the following command change <architecture> to AMD64 or IA64, based on the architecture you want to create and then boot your USB stick. Change <path to wim > to the INSTALL.WIM file path.

cd /d “c:\Program Files (x86)\Windows Kits\8.1\Assessment and Deployment Kit\Deployment Tools\<architecture>\DISM”

dism.exe /apply-image /Imagefile: <path to wim> /Index:1 /ApplyDir:R:\

4. Using the diskpart tool you have to detach the virtual disk from your computer using the following command lines:

diskpart

select vdisk file=c:\hvpvboot\HYPV2012R2.vhdx

detach vdisk

exit

5. Now you can attach the USB stick you want to use to be formatted and to receive the VHD file created in the previous steps.

6. Use the diskpart tool again to identify the USB stick disk number.

diskpart

list disk

7. Use the following commands to create and format a new partition and assign the letter Z to the USB stick. Replace <USB Stick number> with the number identified in the previous task.

select disk <USB stick number>

clean

create partition primary

select partition 1

active

format quick fs=ntfs

assign letter=v

exit

8. Copy the VHDX file created in step 2 to the V: drive where the USB stick is attached.

9. Use the Bootsect tool to update the master boot code. From the following command, change <architecture> to AMD64 or IA64, based on the architecture that you want to create. Boot your USB stick.

cd /d ” c:\Program Files (x86)\Windows Kits\8.1\Assessment and Deployment Kit\Deployment Tools\<architecture>\BCDBoot”

bootsect /nt60 v: /force /mbr

10. Use the diskpart tool again to attach the VHDX file to the Z drive.

diskpart

select vdisk file=v:\HYPV2012R2.vhdx

attach vdisk

exit

11. Use the BCDBoot tool to copy the necessary boot files so that you can boot your USB stick.

bcdboot r:\windows /s v:

12. As you are installing Hyper-V Server on a USB flash drive rather than a normal hard drive, you have to disable the paging file. Use the following command to load the registry from the VHDX file:

reg load HKLM\HyperVTemp r:\windows\system32\config\system

13. Remove the page file value from the registry with the following command:

reg add “HKLM\HyperVTemp\ControlSet001\Control\Session Manager\Memory Management” /v PagingFiles /t REG_MULTI_SZ /d “” /f

14. Delete the page file entry with the following command:

reg delete “HKLM\HyperVTemp\ControlSet001\Control\Session Manager\Memory Management” /v ExistingPageFiles /f

15. Unload the temporary registry with the following command line:

reg unload HKLM\HyperVTemp

16. Type the following commands to detach the VHD file from the Z drive:

diskpart

select vdisk file=z:\HYPV2012R2.vhdx

detach vdisk

exit

17. Now you can remove the USB stick from your computer and attach it onto another computer to boot Hyper-V 2012 R2 Server.
NOTE: You may need to change the boot order or the boot configuration from your computer BIOS to allow it to boot from USB.

18. At the first bootup, your bootable Hyper-V will be loaded and the system will prompt you to add the new administrator password. Type the new password twice and click on OK.

19. After the first login, Hyper-V will load the SConfig tool, allowing you to change the most common settings using a friendly command-line interface.

20. Now you can set up your Hyper-V Server and enable remote administration to manage it, using Hyper-V Manager from another computer.

Cheers,


Marcos Nogueira
http://blog.marcosnogueira.org
Twitter: @mdnoga

Configuring constrained delegation to authenticate live migrations

Constrained delegation allows live migrations to be started using any remote management tool and might help in providing more flexibility to move your VMs.

If the connection between the source and destination computers cannot be authenticated, an error occurs and the following message is displayed:

Virtual machine migration operation failed at migration Source.

Failed to establish a connection with host<computer name>: No credentials are available in the security package (0x8009030E).

To solve this issue you have to configuring constrained delegation to authenticate live migrations on both Hyper-V servers.

To enable it, just follow this steps

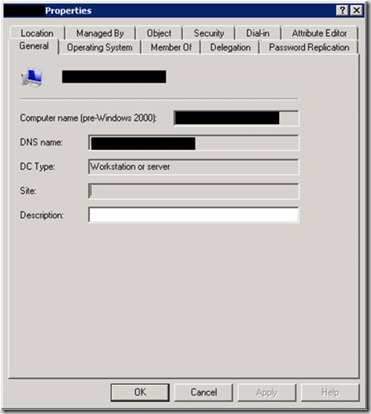
1. Open Active Directory Users and Computers

2. Right-click on the host computer account

3. Click on Properties.

clip_image002

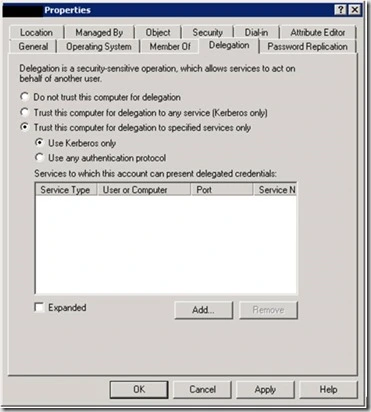
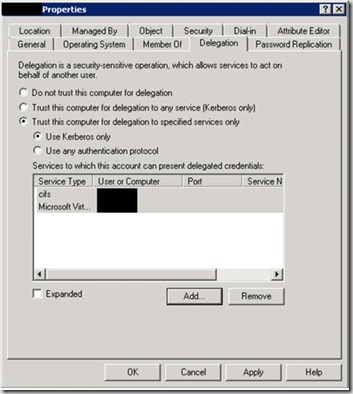
4. In the Properties window, click on the Delegation tab, select Trust this computer for delegation to the specified services only

clip_image004

5. Select Use Kerberos only.

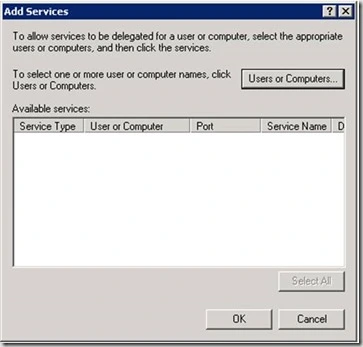
6. Click on Add

clip_image006

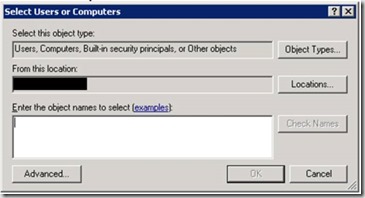
7. Click Users or Computers.

clip_image008

8. In the Select Users or Computers box, type the destination host server name and click OK.

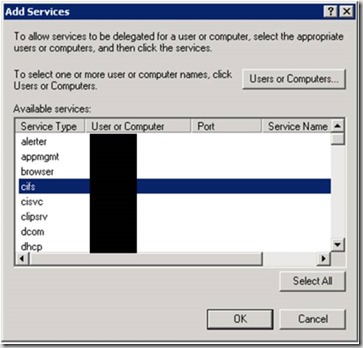
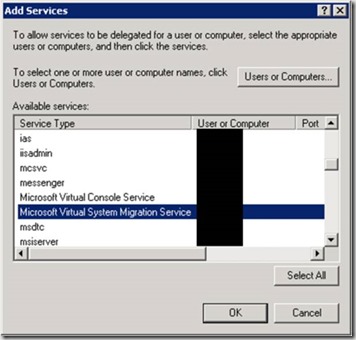
9. In the Add Services dialog box

a. Select cifs

clip_image010

b. Select Microsoft Virtual System Migration Service

clip_image012

c. Click on OK. The two services will be listed in the service type, as shown in the next screenshot:

clip_image014

10. Click on OK to close the computer properties window and repeat the same process on the destination server computer account.

NOTE: The configuration changes do not take effect until the following has occurred:

· The changes have replicated to the domain controllers that the servers running Hyper-V are logged into.

· A new Kerberos ticket has been issued. 

After that, you can change the live migration authentication type to use Kerberos.

Cheers,


Marcos Nogueira
http://blog.marcosnogueira.org
Twitter: @mdnoga
How to plan your System Center Virtual Machine Manager Networks

For several times I have just ending up to explain how we should handle with networks on SCVMM in different scenarios. Here is the base that I use to planning SCVMM networks for all scenarios.

SCVMM provides many options when you plan to connect your virtual machines to a physical network. You can use these options on their own or in a mixed environment, depending on your needs.

  • VLAN-based configuration – You can use familiar virtual area network (VLAN) technology for network isolation. You can manage those networks as they are, using SCVMM to simplify the management process.
  • No isolation – You can get direct access to the logical network with a VM network. This is the simplest configuration, where the VM network is the same as the logical network on which it is configured. This configuration is appropriate for a network through which you will manage a host.
  • Network virtualization – You can support multiple tenants (also called clients or customers) with their own networks, isolated from the networks of others. With this isolation, your tenants can use any IP addresses that they want for their virtual machines, regardless of the IP addresses that are used on other VM networks. Also, you can allow your tenants to configure some aspects of their own networks, based on limits that you specify. Network virtualization abstracts the physical address space and presents a virtual address space of the tenants.
  • Use external networks – You can use a vendor network-management console that allows you to configure settings on your forwarding extension, for example, settings for logical networks, network sites, and VM networks. SCVMM will import those settings.
  • No virtual networking – Networks that don’t require access by VMs do not use VM networks. For example, storage networks.

Networking Level

How SCVMM networking can be used

Physical Fabric

Fabric administrators can maintain network hardware (such as network adapters and switches) without requiring other administrators or users to understand it. Fabric administrators can maintain a stable physical network configuration while still being able to provide flexibility to others who need specific IP address spaces for their virtual machines.

Logical Networks and Logical Switches

Fabric administrators can create logical networks and logical switches as an underlying configuration that is straightforward to maintain and is not visible to tenant administrators or users.

VM Networks

Tenant administrators can create VM network easily, making it easy to respond when users need additional or different IP address spaces. (Tenant administrators can also control resource usage through user role quotas.)
Self-service users can create virtual machines and connect them to VM networks without having to involve tenant administrators.

Cheers,


Marcos Nogueira
http://blog.marcosnogueira.org
Twitter: @mdnoga
Windows Server 2012 R2 Hyper-V vs VMware vSphere 5.5


On my search for comparing the newest version of VMware with Hyper-V 2012 R2 I found this chart that I think it will summarize what you need to know about the two Hypervisors.

How to compare?


Rather than simply comparing feature-by-feature using just simple check-marks in each category, I’ll try to provide as much detail as possible for you to intelligently compare each area.  For each comparison area, I’ll rate the related capabilities with the following color coded rankings:

  • Supported – Fully supported without any additional products or licenses
  • Limited Support – Significant limitations when using related feature, or limitations in comparison to the competing solution represented
  • Not Supported – Not supported at all or without the addition of other product licensing costs

Licensing


Microsoft 
Windows Server 2012 R2
+ System Center 2012 R2 Datacenter Editions

VMware 
vSphere 5.5 Enterprise Plus + vCenter Server 5.5

Notes

# of Physical CPUs per License

2

1

With Microsoft, each Datacenter Edition license provides licensing for up to 2 physical CPUs per Host.  Additional licenses can be “stacked” if more than 2 physical CPUs are present.

With VMware, a vSphere 5.5 Enterprise Plus license must be purchased for each physical CPU.  This difference in CPU licensing is one of the factors that can contribute to increased licensing costs.  In addition, a minimum of one license of vCenter Server 5.5 is required for vSphere deployments.

# of Managed OSE’s per License

Unlimited

Unlimited

Both solutions provide the ability to manage an unlimited number of Operating System Environments per licensed Host.

# of Windows Server VM Licenses per Host

Unlimited

0

With VMware, Windows Server VM licenses must still be purchased separately. In environments virtualizing Windows Server workloads, this can contribute to a higher overall cost when virtualizing with VMware.

VMware does include licenses for an unlimited # of VMs running SUSE Linux Enterprise Server per Host.

Includes Anti-virus / Anti-malware protection

Yes – System Center Endpoint Protection agents included for both Host and VMs with System Center 2012 R2

Yes – Includes vShield Endpoint Protection which deploys as EPSEC thin agent in each VM + separate virtual appliance.


Includes full SQL Database Server licenses for management databases

Yes – Includes all needed database server licensing to manage up to 1,000 hosts and 25,000 VMs per management server.

No Must purchase additional database server licenses to scale beyond managing 100 hosts and 3,000 VMs with vCenter Server Appliance.

VMware licensing includes an internal vPostgres database that supports managing up to 100 hosts and 3,000 VMs via vCenter Server Appliance.

Includes licensing for Operations Monitoring and Management.

Yes – Included in System Center 2012 R2

No – Operations Monitoring and Management requires separate license for vCenter Operations Manager or upgrade to vSphere with Operations Management


Includes licensing for Private Cloud Management capabilities – pooled resources, self-service, delegation, automation, elasticity, chargeback/showback

Yes – Included in System Center 2012 R2

No – Private Cloud Management capabilities require additional cost of VMware vCloud Suite.


Virtualization Scalability


Microsoft 
Windows Server 2012 R2 
+ System Center 2012 R2 Datacenter Editions

VMware 
vSphere 5.5 Enterprise Plus + vCenter Server 5.5

Notes

Maximum # of Logical Processors per Host

320

320

With vSphere 5.5 Enterprise Plus, VMware has “caught up” to Microsoft in terms of Maximum # of Logical Processors supported per Host.

Maximum Physical RAM per Host

4TB

4TB

With vSphere 5.5 Enterprise Plus, VMware has “caught up” to Microsoft in terms of Maximum Physical RAM supported per Host.

Maximum Active VMs per Host

1,024

512


Maximum Virtual CPUs per VM

64

64

When using VMware FT, only 1 Virtual CPU per VM can be used.

Hot-Adjust Virtual CPU Resources to VM

Yes – Hyper-V provides the ability to increase and decrease Virtual Machine limits for processor resources on running VMs.

Yes – Can Hot-Add virtual CPUs for running VMs on selected Guest Operating Systems and adjust Limits/Shares for CPU resources.

VMware Hot-Add CPU feature requires supported Guest Operating System. Check VMware Compatibility Guide for details.

VMware Hot-Add CPU feature not supported when using VMware FT

Maximum Virtual RAM per VM

1TB

1TB

When using VMware FT, only 64GB of Virtual RAM per VM can be used.

Hot-Add Virtual RAM to VM

Yes ( Dynamic Memory )

Yes

Requires supported Guest Operating System.

Dynamic Memory Management

Yes ( Dynamic Memory )

Yes (Memory Ballooning) Note that memory overcommit is not supported for VMs that are configured as an MSCS VM Guest Cluster.

VMware vSphere 5.5 also supports another memory technique: Transparent Page Sharing (TPS).  While TPS was useful in the past on legacy server hardware platforms and operating systems, it is no longer effective in many environments due to modern servers and operating systems supporting Large Memory Pages (LMP) for improved memory performance.

Guest NUMA Support

Yes

Yes

NUMA = Non-Uniform Memory Access.  Guest NUMA support is particularly important for scalability when virtualizing large multi-vCPU VMs on Hosts with a large number of physical processors.

Maximum # of physical Hosts per Cluster

64

32


Maximum # of VMs per Cluster

8,000

4,000


Virtual Machine Snapshots

Yes – Up to 50 snapshots per VM are supported.

Yes – Up to 32 snapshots per VM chain are supported, but VMware only recommends 2-to-3.

In addition, VM Snapshots are not supported for VMs using an iSCSI initiator.


Integrated Application Load Balancing for Scaling-Out Application Tiers

Yes – via System Center 2012 R2 VMM

No – Requires additional purchase of vCloud Network and Security (vCNS) or vCloud Suite.


Bare metal deployment of new Hypervisor hosts and clusters

Yes – via System Center 2012 R2 VMM

Yes – Vmware Auto Deploy and Host Profiles supports bare metal deployment of new hosts into an existing cluster, but does not support bare metal deployment of new clusters.


Bare metal deployment of new Storage hosts and clusters

Yes – via System Center 2012 R2 VMM

No


GPU Virtualization for Advanced VDI Graphics

Yes – Server GPUs can be virtualized and shared across VDI VMs via RemoteFX.

Yes – via virtual GPU support.


Virtualization of USB devices

Yes – Client USB devices can be passed to VMs via Remote Desktop connections. Direct redirection of USB storage from Host possible with Windows-to-Go certified devices.  Direct redirection of other USB devices possible with third-party solutions.

Yes – via USB Pass-through support.


VM Portability, High Availability and Disaster Recovery


Microsoft 
Windows Server 2012 R2 
+ System Center 2012 R2 Datacenter Editions

VMware 
vSphere 5.5 Enterprise Plus + vCenter Server 5.5

Notes

Live Migration of running VMs

Yes – Unlimited concurrent Live VM Migrations.  Provides flexibility to cap at a maximum limit that is appropriate for yourdatacenter architecture.

Yes – but limited to 4 concurrent vMotions per host when using 1GbE network adapters and 8 concurrent vMotions per host when using 10GbE network adapters.


Live Migration of running VMs without shared storage between hosts

Yes – Supported via Shared Nothing Live Migration

Yes – Supported via Enhanced vMotion.


Live Migration using compression of VM memory state

Yes – Supported via Compressed Live Migration, providing up to a 2X increase in Live Migration speeds.

No


Live Migration over RDMA-enabled network adapters

Yes – Supported via SMB-Direct Live Migration, providing up to a 10X increase in Live Migration speeds.

No


Live Migration of VMs Clustered with Windows Server Failover Clustering (MSCS Guest Cluster)

Yes – by configuring relaxed monitoring of MSCS VM Guest Clusters.

No – based on documented vSphere MSCS Setup Limitations


Highly Available VMs

Yes – Highly available VMs can be configured on a Hyper-V Host cluster.  If the application running inside the VM is cluster aware, a VM Guest Cluster can also be configured via MSCS for faster application failover times.

Yes – Supported by VMware HA, but with the limitations listed above when using MSCS VM Guest Clusters.


Failover Prioritization of Highly Available VMs

Yes – Supported by clustered priority settings on each highly available VM.

Yes


Affinity Rules for Highly Available VMs

Yes – Supported by preferred cluster resource owners and anti-affinity VM placement rules.

Yes


Cluster-Aware Updating for Orchestrated Patch Management of Hosts.

Yes – Supported via included Cluster-Aware Updating (CAU) role service.

Yes – Supported by vSphere 5.5 Update Manager, but if using vCenter Server Appliance, need separate 64-bit Windows OS license for Update Management server.  If supporting more than 5 hosts and 50 VMs, also need a separate SQL database server.


Guest OS Application Monitoring for Highly Available VMs

Yes

Yes – Provided by vSphere App HA, but limited to only the following applications: Apache Tomcat, IIS, SQL Server, Apache HTTP Server, SharePoint, SpringSource Runtime.


VM Guest Clustering via Shared Virtual Hard Disk files

Yes – Provided via native Shared VHDX support for VM Guest Clusters

Yes – But only Single-Host VM Guest Clustering supported via Shared VMDK files.  For VM Guest Clusters that extend across multiple hosts, must use RDM instead.


Intelligent Placement of new VM workloads

Yes – Provided via Intelligent Placement in System Center 2012 R2

Yes – Provided via vSphere DRS, but without ability to intelligently place fault tolerant VMs using VMware FT.


Automated Load Balancing of VM Workloads across Hosts

Yes – Provided via Dynamic Optimization in System Center 2012 R2

Yes – Provided via vSphere DRS, but without ability to load-balance VM Guest Clusters using MSCS.


Power Optimization of Hosts when load-balancing VMs

Yes – Provided via Power Optimization in System Center 2012 R2

Yes – Provided via vSphere DRS, with the same limitations listed above for Automated Load Balancing.


Fault Tolerant VMs

No – The vast majority of application availability needs can be supported via Highly Available VMs and VM Guest Clustering on a more cost-effective and more-flexible basis than software-based fault tolerance solutions.  If required for specific business applications, hardware-based fault tolerance server solutions can be leveraged where needed.

Yes – Supported via VMware FT, but there are a large number of limitations when using VMware FT, including no support for the following when using VMware FT: VM Snapshots, Storage vMotion, VM Backups via vSphere Data Protection, Virtual SAN, Multi-vCPU VMs, More than 64GB of vRAM per VM.

Software-based fault tolerance solutions, such as VMware FT, generally have significant limitations.  If applications require more comprehensive fault tolerance than provided via Highly Available VMs and VM Guest Clustering, hardware-based fault tolerance server solutions offer an alternative choice without the limits imposed by software-based fault tolerance solutions.

Backup VMs and Applicatons

Yes – Provided via included System Center 2012 R2Data Protection Manager with support for Disk-to-Disk, Tape and Cloud backups.

Yes – Only supports Disk-to-Disk backup of VMs via vSphere Data Protection.  Application-level backup integration requires separately purchased vSphere Data Protection Advanced.


Site-to-Site Asynchronous VM Replication

Yes – Provided via Hyper-V Replica with 30-second, 5-minute or 15-minute replication intervals. Minimum RPO = 30-seconds.

Hyper-V Replica also supports extended replication across three sites for added protection.

Yes – Provided via vSphere Replication with minimum replication interval of 15-minutes. Minimum RPO = 15-minutes.

In VMware solution, Orchestrated Failover of Site-to-Site replication can be provided via separately licensed VMware SRM.

In Microsoft solution, Orchestrated Failover of Site-to-Site replication can be provided via included PowerShell at no additional cost. Alternatively, a GUI interface for orchestrating failover can be provided via the separately licensed Windows Azure HRM service.


Storage


Microsoft 
Windows Server 2012 R2 
+ System Center 2012 R2 Datacenter Editions

VMware 
vSphere 5.5 Enterprise Plus + vCenter Server 5.5

Notes

Maximum # Virtual SCSI Hard Disks per VM

256 ( Virtual SCSI )

60 ( PVSCSI )
120 ( Virtual SATA )


Maximum Size per Virtual Hard Disk

64TB

62TB

vSphere 5.5 support for 62TB VMDK files is limited to when using VMFS5 and NFS datastores only. 

In vSphere 5.5, VMFS3 datastores are still limited to 2TB VMDK files. 

In vSphere 5.5, Hot-Expand, VMware FT, Virtual Flash Read Cache and Virtual SAN are not supported with 62TB VMDK files.

Boot VM from Virtual SCSI disks

Yes ( Generation 2 VMs )

Yes


Hot-Add Virtual SCSI VM Storage for running VMs

Yes

Yes


Hot-Expand Virtual SCSI Hard Disks for running VMs

Yes

Yes – but not supported with new 62TB VMDK files.


Hot-Shrink Virtual SCSI Hard Disks for running VMs

Yes

No


Storage Quality of Service

Yes ( Storage QoS )

Yes ( Storage IO Control )

In VMware vSphere 5.5, Storage IO Control is not supported for RDM disks.

In Windows Server 2012 R2, Storage QoS is not supported for Pass-through disks.

Virtual Fibre Channel to VMs

Yes ( 4 Virtual FC ports per VM )

Yes ( 4 Virtual FC ports per VM )

vSphere 5.5 Enterprise Plus also includes a software initiator for FCoE support for VMs. 

While not included inbox in Windows Server 2012 R2, a no-cost ISV solution is available here to provide FCoE support for Hyper-V VMs.

Live Migrate Virtual Storage for running VMs

Yes – Unlimited concurrent Live Storage migrations. Provides flexibility to cap at a maximum limit that is appropriate for your datacenter architecture.

Yes – but only up to 2 concurrent Storage vMotion operations per host / only up to 8 concurrent Storage vMotion operations per datastore.  Storage vMotion is also not supported for MSCS VM Guest Clusters.


Flash-based Read Cache

Yes – Using SSDs in Tiered Storage Spaces, limited up to 160 physical disks and 480 TB total capacity.

Yes – but only up to 400GB of cache per virtual disk / 2TB cumulative cache per host for all virtual disks.


Flash-based Write-back Cache

Yes – Using SSDs in Storage Spaces for Write-back Cache.

No


SAN-like Storage Virtualization using commodity hard disks.

Yes – Included in Windows Server 2012 R2 Storage Spaces.

No

VMware provides Virtual SAN which is included as an experimental feature in vSphere 5.5.  You can test and experiment with Virtual SAN, but VMware does not expect it to be used in a production environment.

Automated Tiered Storage between SSD and HDD using commodity hard disks.

Yes – Included in Windows Server 2012 R2 Storage Spaces.

No

VMware provides Virtual SAN which is included as an experimental feature in vSphere 5.5.  You can test and experiment with Virtual SAN, but VMware does not expect it to be used in a production environment.

Can consume storage via iSCSI, NFS, Fibre Channel and SMB 3.0.

Yes

Yes – Except no support for SMB 3.0.


Can present storage via iSCSI, NFS and SMB 3.0.

Yes – Available via included iSCSI Target Server, NFS Server and Scale-out SMB 3.0 Serversupport.  All roles can be clustered for High Availability.

No

VMware provides vSphere Storage Appliance as a separately licensed product to deliver the ability to present NFS storage.

Storage Multipathing

Yes – via MPIO and SMB Multichannel

Yes – via VAMP


SAN Offload Capability

Yes – via ODX

Yes – via VAAI


Thin Provisioning and Trim Storage

Yes – Available via Storage Spaces Thin Provisioning and NTFS Trim Notifications.

Yes – but trim operations must be manually processed by running esxcli vmfs unmap command to reclaim disk space.


Storage Encryption

Yes – via BitLocker

No


Deduplication of storage used by running VMs

Yes – Available via included Data Deduplication role service.

No


Provision VM Storage based on Storage Classifications

Yes – via Storage Classifications in System Center 2012 R2

Yes – via Storage Policies, formerly called Storage Profiles, in vCenter Server 5.5


Dynamically balance and re-balance storage load based on demands

Yes – Storage IO load balancing and re-balancing is automatically handled on-demand by both SMB 3.0 Scale Out File Server and Automated Storage Tiers in Storage Spaces.

Yes – Performed via Storage DRS, but limited in load-balancing frequency.  The default DRS load-balance interval only runs at 8-hour intervals and can be adjusted to run load-balancing only as often as every 1-hour.


Integrated Provisioning and Management of Shared Storage

Yes – System Center 2012 R2 VMM includes storage provisioning and management of SAN Zoning, LUNS and Clustered Storage Servers.

No


Networking


Microsoft 
Windows Server 2012 R2 
+ System Center 2012 R2 Datacenter Editions

VMware 
vSphere 5.5 Enterprise Plus + vCenter Server 5.5

Notes

Distributed Switches across Hosts

Yes – Supported by Logical Switches in System Center 2012 R2

Yes


Extensible Virtual Switches

Yes – Several partners offer extensions today, such as Cisco, NEC, Inmon and 5nine. Windows Server 2012 R2 offers new support for co-existence of Network Virtualization and Switch Extensions.

Replaceable, not extensible – VMware virtual switch is replaceable, not incrementally extensible with multiple 3rd party solutions concurrently


NIC Teaming

Yes – Up to 32 NICs per NIC Team.  Windows Server 2012 R2 provides new Dynamic Load Balancing mode using flowlets to provide efficient load balancing even between a small numbers of hosts.

Yes – Up to 32 NICs per Link Aggregation Group


Private VLANs (PVLAN)

Yes

Yes


ARP Spoofing Protection

Yes

No – Requires additional purchase of vCloud Network and Security (vCNS) or vCloud Suite.


DHCP Snooping Protection

Yes

No – Requires additional purchase of vCloud Network and Security (vCNS) or vCloud Suite.


Router Advertisement Guard Protection

Yes

No – Requires additional purchase of vCloud Network and Security (vCNS) or vCloud Suite.


Virtual Port ACLs

Yes – Windows Server 2012 R2 adds support for Extended ACLs that include Protocol, Src/Dst Ports, State, Timeout & Isolation ID

Yes – via new Traffic Filtering and Marking policies in vSphere 5.5 distributed switches


Trunk Mode to VMs

Yes

Yes


Port Monitoring

Yes

Yes


Port Mirroring

Yes

Yes


Dynamic Virtual Machine Queue

Yes

Yes


IPsec Task Offload

Yes

No


Single Root IO Virtualization (SR-IOV)

Yes

Yes – SR-IOV is supported by vSphere 5.5 Enterprise Plus, but without support for vMotion, Highly Available VMs or VMware FT when using SR-IOV.


Virtual Receive Side Scaling ( Virtual RSS )

Yes

Yes ( VMXNet3 )


Network Quality of Service

Yes

Yes


Network Virtualization

Yes – Provided via Hyper-V Network Virtualization based on NVGRE protocol and in-box Site-to-Site NVGRE Gateway.

No – Requires additional purchase of VMware NSX


Integrated Network Management of both Virtual and Physical Network components

Yes – System Center 2012 R2 VMM supports integrated management of virtual networks, Top-of-Rack (ToR) switches and integrated IP Address Management

No


Guest Operating Systems


Microsoft 
Windows Server 2012 R2 
+ System Center 2012 R2 Datacenter Editions

VMware 
vSphere 5.5 Enterprise Plus + vCenter Server 5.5

Notes

Windows Server 2012 R2

Yes

Yes


Windows 8.1

Yes

Yes


Windows Server 2012

Yes

Yes


Windows 8

Yes

Yes


Windows Server 2008 R2 SP1

Yes

Yes


Windows Server 2008 R2

Yes

Yes


Windows 7 with SP1

Yes

Yes


Windows 7

Yes

Yes


Windows Server 2008 SP2

Yes

Yes


Windows Home Server 2011

Yes

No


Windows Small Business Server 2011

Yes

No


Windows Vista with SP2

Yes

Yes


Windows Server 2003 R2 SP2

Yes

Yes


Windows Server 2003 SP2

Yes

Yes


Windows XP with SP3

Yes

Yes


Windows XP x64 with SP2

Yes

Yes


CentOS 5.7, 5.8, 6.0 – 6.4

Yes

Yes


CentOS Desktop 5.7, 5.8, 6.0 – 6.4

Yes

Yes


Red Hat Enterprise Linux 5.7, 5.8, 6.0 – 6.4

Yes

Yes


Red Hat Enterprise Linux Desktop 5.7, 5.8, 6.0 – 6.4

Yes

Yes


SUSE Linux Enterprise Server 11 SP2 & SP3

Yes

Yes


SUS Linux Enterprise Desktop 11 SP2 & SP3

Yes

Yes


OpenSUSE 12.1

Yes

Yes


Ubuntu 12.04, 12.10, 13.10

Yes

Yes Currently13.04 in the 13.x distros


Ubuntu Desktop 12.04, 12.10, 13.10

Yes

Yes Currently13.04 in the 13.x distros


Oracle Linux 6.4

Yes – Oracle has certified its supported products to run on Hyper-V and Windows Azure

Yes However, per this Oracle article, Oracle has not certified any of its products to run on VMware. Oracle will only provide support for issues that are either known to occur on the native OS, or can be demonstrated not to be as a result of running on VMware.


Mac OS X 10.7.x & 10.8.x

No

Yes – However, see note to the right.  Based on current Apple EULA, this configuration may not be legally permitted in your environment.

Note that according to the Apple EULA for Mac OS X, it is not permitted to install Mac OS X on any platform that is not Apple-branded hardware. If you choose to virtualize Mac OS X on non-Apple hardware platforms, it’s my understanding that you’re violating the terms of the Apple EULA.

Sun Solaris 10

No

Yes However, per this Oracle article, Oracle has not certified any of its products to run on VMware. Oracle will only provide support for issues that are either known to occur on the native OS, or can be demonstrated not to be as a result of running on VMware.


If you’re looking for the full list of Guest Operating Systems supported by each platform, you can find the full details at the following locations:

Managing Heterogeneous Hypervisor Environments

In certain scenarios, you may find that a mix of virtualization platforms is needed to cost-effectively support all the features and Guest Operating Systems for which you’re looking, in which case you’ll be pleased to find that Microsoft System Center 2012 R2 also supports Private Cloud management across heterogeneous hypervisors, including Hyper-V, VMware vSphere and Citrix XenServer. 

Summary

As you can see, both Microsoft Windows Server 2012 R2 / System Center 2012 R2 and VMware vSphere 5.5 offer lots of enterprise-grade virtualization features.  Hopefully this comparison was useful to you in more granularly evaluating each platform for your environment.

Cheers,


Marcos Nogueira
http://blog.marcosnogueira.org
Twitter: @mdnoga


Note: See here the full article

Storage QoS on VMs in Hyper-V 2012 R2

With Windows Server 2012 R2, Hyper-V includes the ability to set certain quality-of-service (QoS) parameters for storage on the virtual machines. Storage QoS provides storage performance isolation in a multitenant environment and mechanisms to notify you when the storage I/O performance does not meet the defined threshold to efficiently run your virtual machine workloads.

Storage QoS allows you to plan for and gain acceptable performance from the investment in storage resources you can:

  • Specify the maximum IOPS allowed for a virtual hard disk that is associated with a virtual machine.
  • Receive a notification when the specified minimum IOPS for a virtual hard disk is not met.
  • Monitor storage-related metrics through the virtual machine metrics interface.

 Benefits

Storage QoS provides the ability to specify a maximum input/output operations per second (IOPS) value for your virtual hard disk. An administrator can throttle the storage I/O to stop a tenant from consuming excessive storage resources that may impact another tenant.

An administrator can also set a minimum IOPS value. They will be notified when the IOPS to a specified virtual hard disk is below a threshold that is needed for its optimal performance.

The virtual machine metrics infrastructure is also updated, with storage related parameters to allow the administrator to monitor the performance and chargeback related parameters.

Maximum and minimum values are specified in terms of normalized IOPS where every 8 K of data is counted as an I/O.

 Requirements

Storage QoS requires that the Hyper-V role is installed. The Storage QoS feature cannot be installed separately. When you install Hyper-V, the infrastructure is enabled for defining QoS parameters associated with your virtual hard disks.

NOTE: Storage QoS is not available if you are using shared virtual hard disks.

 How to use

Virtual hard disk maximum IOPS

Storage QoS provides the following features for setting maximum IOPS values (or limits) on virtual hard disks for virtual machines:

  • You can specify a maximum setting that is enforced on the virtual hard disks of your virtual machines. You can define a maximum setting for each virtual hard disk.
  • Virtual disk maximum IOPS settings are specified in terms of normalized IOPS. IOPS are measured in 8 KB increments.
  • You can use the WMI interface to control and query the maximum IOPS value you set on your virtual hard disks for each virtual machine.
  • Windows PowerShell enables you to control and query the maximum IOPS values you set for the virtual hard disks in your virtual machines.
  • Any virtual hard disk that does not have a maximum IOPS limit defined defaults to 0.
  • The Hyper-V Manager user interface is available to configure maximum IOPS values for Storage QoS.

Virtual hard disk minimum IOPS

Storage QoS provides the following features for setting minimum values (or reserves) on virtual hard disks for virtual machines:

  • You can define a minimum IOPS value for each virtual hard disk, and an event-based notification is generated when the minimum IOPS value is not met.
  • Virtual hard disk minimum values are specified in terms of normalized IOPS. IOPS are measured in 8 KB increments.
  • You can use the WMI interface to query the minimum IOPS value you set on your virtual hard disks for each virtual machine.
  • Windows PowerShell enables you to control and query the minimum IOPS values you set for the virtual hard disks in your virtual machines.
  • Any virtual hard disk that does not have a minimum IOPS value defined will default to 0.
  • The Hyper-V Manager user interface is available to configure minimum IOPS settings for Storage QoS.

Cheers,


Marcos Nogueira
http://blog.marcosnogueira.org
Twitter: @mdnoga
Configuring a Shared Virtual Hard Disk

Starting in Windows Server 2012 R2 Preview, Hyper-V makes it possible to share a virtual hard disk file between multiple virtual machines. Sharing a virtual hard disk file (.vhdx) provides the shared storage that is necessary for a Hyper-V guest failover cluster.

Using a shared virtual hard disk is ideal for the following situations:

· SQL Server database files.

· File server services running within a virtual machine.

· Database files that reside on shared disks.

Create and enable a shared virtual hard disk on a virtual machine

Open Hyper-V Manager if it is not already open. (From Server Manager, click Tools and then click Hyper-V Manager.)

Under Virtual Machines, select the virtual machine that you want to configure with a shared virtual hard disk..

In the Actions pane, click Settings.

clip_image002

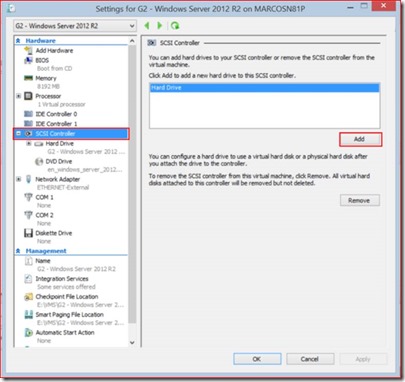
Click SCSI Controller.

On the left pane, under SCSI Controller, click Add.

clip_image004[4]

On the left pane, under Hard Drive, click New to start the New Virtual Hard Disk Wizard..

clip_image006

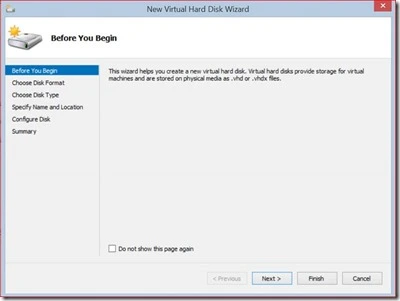
On the Before You Begin page, click Next

clip_image008

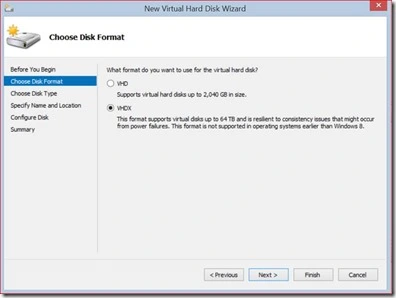
On the Choose Disk Format, accept the default VHDX. Click Next.

clip_image010

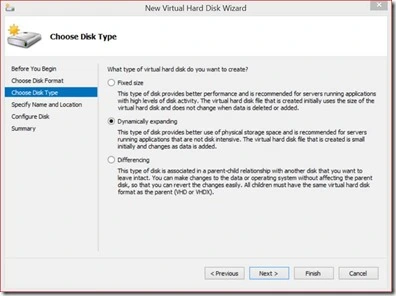
On the Choose Disk Type Page, accept the default Dynamic Expanding. Click Next.

clip_image012

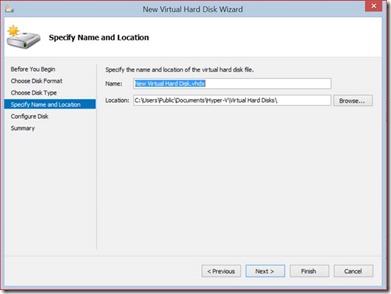
On the Specify Name and Location page, enter the name of your shared virtual hard disk..

On the Specify Name and Location page, click Browse. Navigate to your shared storage location. (Cluster Shared Volumes (CSV) or on a Scale-Out File Server Cluster with SMB 3.0). 

Click Select Folder. Click Next

clip_image014

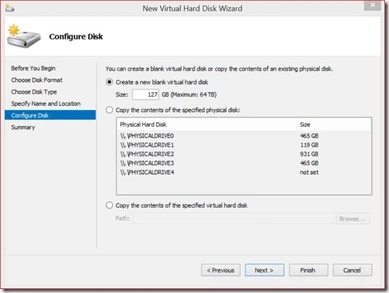
On the Configure Disk page, verify the size of the new virtual hard disk and alter to desired size or accept default. Click Next

clip_image016

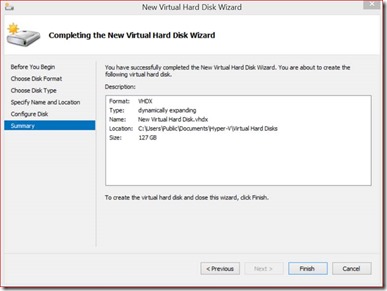
On the Completing the New Virtual Hard Disk Wizard, review your configuration and Click Finish

clip_image018

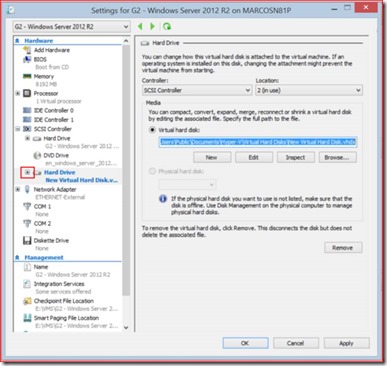
The new virtual hard disk is now created and needs to be enabled as a shared virtual hard disk. Click the Hard Drive you just created under SCSI Controller

Click the “+” symbol next to the hard disk. 

clip_image020

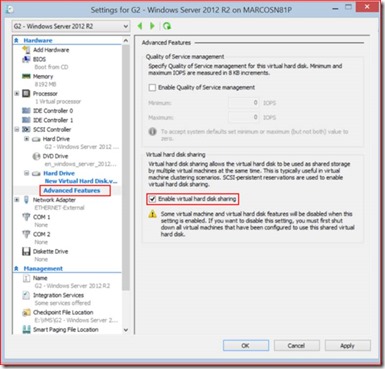
Click Advanced Features.

On the right hand size, under Virtual hard disk sharing, click Enable virtual hard disk sharing

Click OK. The shared virtual hard disk is now created and enabled. 

Resuming

Sharing a virtual hard disk file (.vhdx) means that you can create and manage a guest failover cluster to protect the application services running inside your virtual machines. Before Windows Server 2012 R2 Preview, if you wanted to create a Hyper-V guest failover cluster, you needed to expose your storage topology to the virtual machine.

Starting in Windows Server 2012 R2 Preview, you can deploy a Hyper-V guest failover cluster that is no longer bound to your storage topology. You can implement a guest failover cluster by using a shared virtual hard disk, Fibre Channel, Server Message Block (SMB), Storage Spaces, or iSCSI storage options. Shared virtual hard disks are only available in Windows Server 2012 R2 Preview. Hyper-V makes it possible to share a virtual hard disk file between multiple virtual machines. Sharing a virtual hard disk file (.vhdx) provides the shared storage that is necessary for a Hyper-V guest failover cluster.

Cheers,


Marcos Nogueira
http://blog.marcosnogueira.org
Twitter: @mdnoga
RTM for Windows Server 2012 R2!

Today Microsoft announce a big milestone: Windows Server 2012 R2 has been released to manufacturing!

http://blogs.technet.com/b/in_the_cloud/archive/2013/08/27/today-is-the-rtm-for-windows-server-2012-r2.aspx

Cheers,


Marcos Nogueira
http://blog.marcosnogueira.org
Twitter: @mdnoga
Free ebook: Introducing Windows Server 2012 R2 Preview Release

Microsoft just announce another free ebook offering from Microsoft Press. Introducing Windows Server 2012 R2 Preview Release (ISBN 9780735682931), by Mitch Tulloch with the Windows Server Team, introduces new features and capabilities, with scenario-based advice on how the platform can meet the needs of your business. Get the high-level overview you need to begin preparing your deployment now. This book is based on the Preview release and will be updated to cover Windows Server 2012 R2 RTM. 6153.9780735682931x_5EFBD7BF

Download the PDF version of this title here (108 pages, 5 MB). UPDATE: The EPUB format is here and the MOBI format is here .

Watch for the lengthier RTM edition of this ebook later this year!

Cheers,


Marcos Nogueira
http://blog.marcosnogueira.org
Twitter: @mdnoga
Automatic Virtual Machine Activation on Windows Server 2012 R2

Automatic Virtual Machine Activation (AVMA) acts as a proof-of-purchase mechanism, helping to ensure that Windows products are used in accordance with the Product Use Rights and Microsoft Software License Terms.

AVMA lets you install virtual machines on a properly activated Windows server without having to manage product keys for each individual virtual machine, even in disconnected environments. AVMA binds the virtual machine activation to the licensed virtualization server and activates the virtual machine when it starts up. AVMA also provides real-time reporting on usage and historical data on the license state of the virtual machine. Reporting and tracking data is available on the virtualization server.

Practical Applications

On virtualization servers that are activated using Volume Licensing or OEM licensing, AVMA offers several benefits.

Server datacenter managers can use AVMA to do the following:

· Activate virtual machines in remote locations

· Activate virtual machines with or without an internet connection

· Track virtual machine usage and licenses from the virtualization server, without requiring any access rights on the virtualized systems

There are no product keys to manage and no stickers on the servers to read. The virtual machine is activated and continues to work even when it is migrated across an array of virtualization servers.

Service Provider License Agreement (SPLA) partners and other hosting providers do not have to share product keys with tenants or access a tenant’s virtual machine to activate it. Virtual machine activation is transparent to the tenant when AVMA is used. Hosting providers can use the server logs to verify license compliance and to track client usage history.

System Requirements

AVMA only requires a virtualization server running Windows Server 2012 R2 Datacenter. The guest virtual machine operating system must be Windows Server 2012 R2 Datacenter, Windows Server 2012 R2 Standard, or Windows Server 2012 R2 Essentials.

How to implement AVMA

1. On a Windows Server 2012 R2 Datacenter virtualization server, install and configure the Microsoft Hyper-V Server role.

2. Create a virtual machine and install a supported server operating system on it.

3. Install the AVMA key in the virtual machine.

a. From an elevated command prompt, run the following command:

slmgr /ipk <AVMA_key>

The virtual machine will automatically activate the license against the virtualization server.

NOTE: You can also employ the AVMA keys in any unattended setup file.

Reporting and Tracking

The registry (KVP) on the virtualization server provides real-time tracking data for the guest operating systems. Because the registry key moves with the virtual machine, you can get license information as well. By default the KVP returns information about the virtual machine, including the following:

· Fully qualified domain name

· Operating system and service packs installed

· Processor architecture

· IPv4 an IPv6 network addresses

· RDP addresses

clip_image001NOTE: KVP data is not secured. It can be modified and is not monitored for changes.

clip_image001[1]IMPORTANT: KVP data should be removed if the AVMA key is replaced with another product key (retail, OEM, or volume licensing key).

Logs

Historical data about AVMA requests is available in a log file on the virtualization server (EventID 12310).

Since the AVMA activation process is transparent, error messages are not displayed. However, the following events are captured in a log file on the virtual machines (EventID 12309).

Notification

Description

AVMA Success

The virtual machine was activated.

Invalid Host

The virtualization server is unresponsive. This can happen when the server is not running a supported version of Windows.

Invalid Data

This usually results from a failure in communication between the virtualization server and the virtual machine, often caused by corruption, encryption, or data mismatch.

Activation Denied

The virtualization server could not activate the guest operating system because the AVMA ID did not match.

Cheers,


Marcos Nogueira
http://blog.marcosnogueira.org
Twitter: @mdnoga
Resizing a virtual hard disk with Windows Server 2012 R2

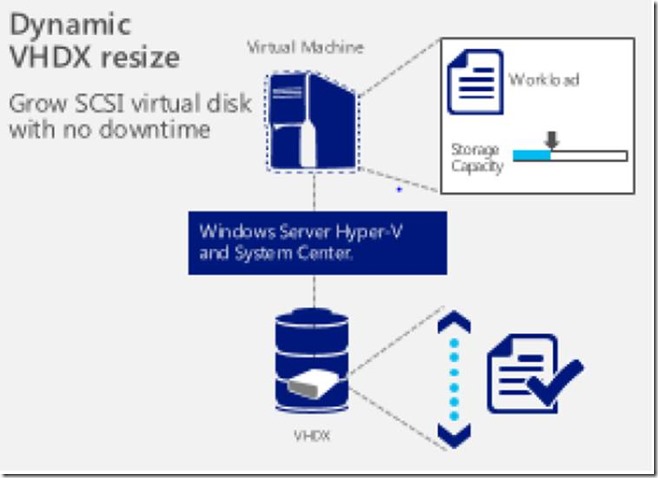
Starting in Windows Server 2012 R2 Preview, Hyper-V delivers the ability to expand or shrink the size of a virtual hard disk while the virtual machine is still running.

Storage administrators can avoid costly downtime by performing maintenance operations on running virtual hard disks. Shutting down virtual machines is no longer required and this eliminates interruption to users accessing those virtual machines and helps reduce maintenance costs. Prior to Windows Server 2012 R2 Preview, if a virtual machine was online or a virtual hard disk was in use, it was not possible to perform maintenance on the virtual hard disk without temporarily shutting down the virtual machine.

Requirements

The following functionality is required for resizing a virtual hard disk:

· A server capable of running Hyper-V. The server must have processor support for hardware virtualization. The Hyper-V role must be installed.

· A user account that is a member of the local Hyper-V Administrators group or the Administrators group.

The following functionality is required for resizing a virtual hard disk:

· VHDX – the ability to expand and shrink virtual hard disks is exclusive to virtual hard disks that are using the .vhdx file format. Online resizing is supported for VHDX disk types, including fixed, differencing, and dynamic disks. Virtual hard disks that use the .vhd file format are not supported for resizing operations.

· SCSI controller – the ability to expand or shrink the capacity of a virtual hard disk is exclusive to .vhdx files that are attached to a SCSI controller. VHDX files that are attached to an IDE controller are not supported.

Understanding online resizing functionality

There are important concepts to understand when increasing or decreasing the capacity of a virtual hard disk.

Expanding a virtual hard disk

Expanding a virtual hard disk increases the disk capacity of the virtual hard disk. However, to make the additional disk space available to the virtual machine requires some extra configuration. From the perspective of the virtual machine, the virtual hard disk expansion is reflected under Disk Manager as an unallocated disk volume. The size of this unallocated volume is the difference between the original virtual hard disk and the nominated size of the expanded virtual hard disk.

To make the full virtual hard disk capacity available to the virtual machine, you need to use Disk Manager to expand the volume within the virtual machine. You can do this by using the Extend Volume Wizard within Disk Manager. After this is complete, you will be able to view the expanded disk capacity in the operating system of the virtual machine.

Shrinking a virtual hard disk

As expected, when you shrink a virtual hard disk, the virtual hard disk capacity is decreased. However, there is a limit to amount of disk space that can be adjusted when you shrink a virtual hard disk. That limit is defined by the size of the volume that is currently in use by the virtual machine. The Hyper-V Manager user interface shows the minimum disk size available for shrinking a virtual hard disk.

If you want to shrink the size of the virtual hard disk below the size of the currently used volume within the virtual machine, you must first use Disk Manager in the operating system of the virtual machine to shrink the volume. After that is complete, you can reduce the size of the virtual hard disk.

Performing online resizing operations

In Windows Server 2012 R2, the option to resize a virtual hard disk is available through the Edit Virtual Hard Disk Wizard. However, the user interface option to shrink a virtual hard disk is only visible for virtual hard disks that have been previously expanded.

Administrators can use the Windows PowerShell interface for online virtual hard disk resizing operations. This can be done by using the Resize-VirtualDisk cmdlet.

Cheers,


Marcos Nogueira
http://blog.marcosnogueira.org
Twitter: @mdnoga

Enhanced Session Mode on Hyper-V 2012 R2

One of the new features or improved feature on Windows Server 2012 R2 is the enhanced session mode through virtual machine connection. Hyper-V and the Virtual Machine Connection tool now support redirection of local resources to a virtual machine session. This feature provides similar type of device redirection to a virtual machine as you get with a Remote Desktop Connection session.

Enhanced Session Mode

In previous versions of Hyper-V the Virtual Machine Connection utility only provided redirection of the virtual machine screen, keyboard, and mouse along with limited copy / paste functionality. To get additional redirection abilities a Remote Desktop Connection to the virtual machine could be initiated, but this would require a network path to the virtual machine.

Starting with Hyper-V in Windows Server 2012 R2 Preview, Hyper-V can now redirect local resources to a virtual machine session through Virtual Machine Connection tool. The enhanced session mode connection uses a Remote Desktop Connection session via the virtual machine bus (VMBus), so no network connection to the virtual machine is required.

The following local resources can be redirected when using the Virtual Machine Connection tool.

· Display configuration

· Audio

· Printers

· Clipboard

· Smart cards

· USB devices

· Drives

· Supported Plug and Play devices

This feature is enabled by default in Client Hyper-V and is disabled by default on Hyper-V running on Windows Server.

The following guest operating systems support enhanced session mode connections:

· Windows Server 2012 R2 Preview

· Windows 8.1 Preview

Practical applications

In previous versions of Hyper-V the way to copy files to and from a virtual machine was via a Remote Desktop Connection session or a network file copy, but these require a working network connection. When connecting to a virtual machine using the Virtual Machine Connection tool you could only copy and paste a limited amount of ASCII text to the virtual machine.

Enhanced session mode allows you to redirect local resources to the a virtual machine in the same way as you can with Remote Desktop Connection, but you do not need network connection to the virtual machine. You only need to be able to connect to the server running Hyper-V where the virtual machine is running.

Enhanced session mode can useful in the following scenarios:

· Troubleshooting a virtual machine without the need for a network connection to the virtual machine.

· Login to the virtual machine via smart card

· Printing from a virtual machine to a local printer

· Developers can now fully test and troubleshoot applications running in a virtual machine that require USB and sound redirection without the need to use Remote Desktop Connection.

Configuring Enhanced Session Mode

Configuration of enhanced session mode is done in the following areas:

· Server settings –Enhanced Session Mode Policy

· User setting –Enhanced Session Mode

· Guest operating system

Server settings – Enhanced Session Mode Policy

This setting affects all virtual machines running on the server running Hyper-V.

The Allow enhanced session mode setting will determine to allow or not allow enhanced session mode connections to virtual machines running on the server running Hyper-V. If this setting is enabled Hyper-V will allow enhanced session mode connections to a virtual machine when the following conditions are met:

· An enhanced session mode connection has been requested by the Virtual Machine Connection tool.

· The virtual machine is running an operating system which supports enhanced session mode.

· The Remote Desktop Service is running in the virtual machine.

When the Allow enhanced session mode setting is disabled, connections from the Virtual Machine Connection tool will use a basic session.

NOTE: The default setting for the Allow enhanced session mode is:

  • Hyper-V on Windows Server 2012 R2 Preview – Disabled
  • Client Hyper-V – Enabled

User settings – Enhanced Session Mode

This setting will determine if the Virtual Machine Connection tool will attempt to use enhanced session mode when available in a guest operating system. When Use enhanced session mode is enable device redirection will take place when the following conditions are met:

· Allow enhanced session mode is enabled on the server running Hyper-V.

· The virtual machine is running an operating system which supports enhanced session mode.

· The Remote Desktop Service is running in the virtual machine.

Guest operating system

The following is a list of the guest operating systems that support enhanced session mode connections.

· Windows Server 2012 R2 Preview

· Windows 8.1 Preview

Additionally the Remote Desktop Service needs to be running and the user account you be using to log on to the virtual machine needs to be a member of the Remote Desktop Users local group or the local Administrators group.

NOTE: Remote Desktop Services group policy and local group policy settings are enforced for enhanced session mode connections. So if there is a policy in effect that does not allow the redirection of printers, printer redirection in a Virtual Machine Connection session will be blocked as it would be for regular Remote Desktop Connection sessions.

Cheers,


Marcos Nogueira
http://blog.marcosnogueira.org
Twitter: @mdnoga

Server management and automation with Windows Server 2012 R2

Datacenter infrastructure has become complex: Multiple industry standards are confusing hardware vendors, and customers are looking for guidance on how to best automate their datacenter while adopting a standards-based management approach supporting their multi-vendor investments. Windows Server 2012 R2 enables IT professionals to meet this need by offering an integrated platform to automate and manage the increasing datacenter ecosystem. Windows Server 2012 R2 delivers capabilities to manage many servers and the devices connecting them, whether they are physical or virtual, on-premises or in the cloud.

Standards-based management

Windows Server 2012 R2 enhances the manageability of datacenters through significant improvements in the standards-based infrastructure. It does this by delivering application programming interfaces (APIs) that are easier for developers and IT Pros to use. These APIs provide support for recent standards and add new kinds of Windows PowerShell commands (cmdlets) that make it simpler and more cost-effective to connect to and manage multiple servers and devices in the datacenter.

WMI is a standard Common Information Model Object Manager (CIMOM) that hosts many standard class providers; however, early on, there was not an interoperable management protocol, so WMI used the Distributed Component Object Model (DCOM). This made it an “island of management” for Windows managing Windows.

This situation changed with the DMTF’s definition and approval of WS-Man, a SOAP-based, firewall-friendly protocol that allows a client on any operating system to invoke operations on a standards-compliant CIMOM running on any platform. Microsoft shipped the first partial implementation of WS-Man in Windows Server 2003 and named it Windows Remote Management (WinRM).

Since Windows Server 2012, WinRM has become the default protocol for management. This provides interoperability with a number of CIMOM and WS-Man stacks available on other platforms, including Openwsman (Perl, Python, Java, and Ruby Bindings), Wiseman, and OpenPegasus.

Simplified multi-server management

Since Windows Server 2012, the capabilities of Server Manager have expanded considerably to facilitate multi-server tasks, such as remote role and feature deployment to both physical and virtual servers, remote role and feature management, and custom server group creation.

By using Server Manager in Windows Server 2012 R2, you can provision servers and offline virtual hard disks from your desktop without requiring either physical access to the system or Remote Desktop Protocol (RDP) connections to each server. Server Manager also helps administrators manage groups of servers collectively from a single, integrated console, allowing them respond to business-critical problems with greater speed and agility.

Robust automation

Windows PowerShell offers comprehensive, resilient, and simple automation of your Windows Servers to help you manage most server roles and aspects of the datacenter. PowerShell sessions to remote servers are resilient and can withstand various types of interruptions. In addition, learning Windows PowerShell has become much easier than ever through improved cmdlet discovery, simplified, consistent syntax across all cmdlets and an integrated scripting environment. In Windows Server 2012 R2, Windows PowerShell 4.0 delivers over 3,000 cmdlets to enable you to manage server roles and automate management tasks quickly.

You can also execute and monitor scripts more efficiently through more robust session connectivity, workflow capabilities, enhanced job scheduling, and Windows PowerShell Web Access. Last not least, you can write Windows PowerShell scripts more quickly and intuitively through the built-in Integrated Scripting Environment (ISE) that enables script sharing, which connects IT Professionals to a larger Windows PowerShell user community.

In addition to the enhanced functionality of Windows PowerShell, you can also rely on new management capabilities in Windows Server 2012 R2 for deploying resources in a repeatable, reliable and standardized manner.

For example, Desired State Configuration provides the ability to help standardize deployments by enabling you to ensure that the components of your datacenter have the correct configuration. To that effect, Windows Server 2012 R2 has PowerShell language extensions and providers which enable declarative, autonomous and repeatable deployment, configuration and conformance of standards-based managed elements. This provides the ability to define the exact configuration of target nodes (computers or devices) and prevent “configuration drift”, thereby providing stable, reliable, standardized deployments.


Cheers,


Marcos Nogueira
http://blog.marcosnogueira.org
Twitter: @mdnoga

System Center 2012 R2 Infrastructure overview

The notion of infrastructure provisioning is about enabling enterprises and service providers to provision physical, virtual, and cloud infrastructure that meets key requirements such as workload scale and performance, multi-tenancy, and chargeback.

Enterprise-class performance

When virtualizing top-tier applications, you need a virtualization platform and virtualization management solution that can provide the necessary scale and performance to meet your business requirements. Many virtualization efforts do not realize their full potential; in many instances, it is due to the lack of adequate datacenter management which can lead to uncontrolled VM sprawl. Simultaneously, the datacenter management solution has to be flexible enough so it builds on your existing infrastructure investments. For example, applications might be deployed on physical servers and consuming SAN-based storage. Also, most customers have to support a diverse datacenter infrastructure environment to deliver on the requirements of their application counterparts.

System Center 2012 R2 delivers best-in-class management for Windows Server environments by supporting the scale and performance delivered by Windows Server 2012 R2. In this context, customers should note that Microsoft is slated to deliver System Center 2012 R2 simultaneously with Windows Server 2012 R2 so that you can plan your infrastructure deployments with the confidence and knowledge that System Center will enable them to take maximum advantage of native platform capabilities. The Virtual Machine Manager (VMM) component of System Center 2012 R2 plays a critical role in enabling virtualization-management scale – for instance, a single VMM server can support up to 1,000 hosts and up to 25,000 virtual machines. As another example, VMM enables Dynamic Memory changes as well as snapshots of running VMs without downtime.

clip_image002

To enable maximum flexibility and operational efficiency for customers, VMM enables storage management across a variety of storage approaches across file and block storage. For who have invested in block-based storage like SAN, VMM supports VM connectivity to SANs through virtual fibre channel switches. This enables IT staff to virtualize the most demanding workloads and connect them directly to the highest tier storage platforms.

Microsoft developed System Center to provide robust support for heterogeneous datacenter management – Dynamic Memory support for Linux VMs being an example. In fact, approximately 25% of System Center instances deployed today also manage Linux operating environments.

Simplified provisioning and migration

As a next step, organizations should consider industry-standard server technologies as an alternative to specialty hardware technologies for big budget infrastructure spending like storage and disaster recovery. These technologies have advanced to the point where they offer many of the capabilities and the performance of specialty hardware, for a fraction of the price. To ensure that scarce IT staff can focus on strategic IT projects versus keeping the train running, they should continue to invest in automation technologies to ensure predictable deployments while mitigating chances of human error.

With Windows Server 2012, Microsoft delivered File and Storage Services (which included Storage Spaces), which is predicated on the use of industry-standard storage that’s completely managed by server software. These storage technologies are designed to provide availability, resiliency, and performance that would normally be expected from high-end hardware. With System Center 2012 R2, VMM supports at-scale management of these storage technologies – for instance, bare-metal provisioning of scale-out Windows File Server clusters, discovery of physical disks, and creation of virtualized storage pools.

To reduce time, effort and downtime required to upgrade from Windows Server 2012, Windows Server 2012 R2 is slated to offer the ability to automatically upgrade Hyper-V clusters (based on Windows Server 2012) to Windows Server 2012 R2 using System Center. The VMM component has a cross-version migration capability that enables Hyper-V Live Migration of workloads from Windows Server 2012 hosts to Windows Server 2012 R2 hosts. Microsoft is also enabling faster deployments of System Center by providing service templates and runbooks for multiple components such as Service Manager, Data Protection Manager, and Operations Manager.

SCVMM also simplifies cross-datacenter disaster recovery of VM-based infrastructure services by providing the private cloud abstraction layer in the source and destination datacenters. This is enabled by System Center working in conjunction with Hyper-V Replica (for VM replication) and Windows Azure Hyper-V Recovery Manager (for automated recovery orchestration). Without this capability, we would be looking at alternatives like expensive SAN-based replication.

Finally, the Orchestrator component of System Center 2012 R2 continues to enable general purpose datacenter automation thereby driving consistency and predictability in provisioning processes like server deployment, patching, and upgrades.

Multitenant cloud infrastructure

As cloud computing adoption increases, large enterprises and hosters are looking to take their datacenter infrastructure to the next level of scale and efficiency and scale, with requirements such as multi-tenancy, bring-your-own-IP flexibility, chargeback, and infrastructure standardization. Many enterprises are also exploring showback and chargeback solutions to incentivize the right infrastructure consumption behaviours by their internal customers.

With System Center 2012, Microsoft enabled multi-hypervisor private clouds for enterprise IT to deliver infrastructure as a pool of automated resources and carve out datacenter capacity for use by their LOB counterparts. Building on that, System Center 2012 SP1 delivered support for multitenant environments (for service providers and large enterprises) through support for virtual networks and the ability to aggregate multiple instances of System Center infrastructure with the Service Provider Foundation (SPF) API.

Building on this strong foundation, System Center 2012 R2 strengthens Microsoft’s software-defined networking solution by enabling provisioning of multitenant edge gateways to bridge physical and virtual datacenters – this will enable flexible workload mobility in hybrid cloud computing models. System Center 2012 R2 enables chargeback for multitenant environments with granular infrastructure metering combined with the ability to do analytics on business and operational metrics. Customers can also take advantage of Cloud Cruiser (ISV, who is part of the Microsoft partner alliance) cost analytics for a more fully featured chargeback solution.

Extend System Center to provision Windows Azure infrastructure

System Center 2012 R2 provides a unified tool to provision and manage virtual machines into on-premises and Windows Azure environments, including easy workload portability without a need for format conversion. The App Controller component of System Center 2012 R2 enables migration of on-premises Hyper-V VMs into Windows Azure Virtual Machines. Once in Windows Azure, the Virtual Machine can be managed (including operations like start, stop) through the App Controller user interface.

The Orchestrator component of System Center 2012 R2 provides a Windows Azure Integration Pack for at-scale provisioning and management of Windows Azure Virtual Machines and Windows Azure Storage in an automated manner.

Cheers,


Marcos Nogueira
http://blog.marcosnogueira.org
Twitter: @mdnoga

Generation 2 Virtual Machine Overview

Virtual machine generation determines the virtual hardware and functionality presented to the virtual machine. In Hyper-V on Windows Server 2012 R2 there are two supported virtual machine generations, generation 1 and generation 2 virtual machines. Generation 2 virtual machines will be presented with a simplified virtual hardware model and supports Unified Extensible Firmware Interface (UEFI) firmware instead of BIOS based firmware. Additionally the majority of emulated (legacy) devices have been removed from generation 2 virtual machines.

In previous versions of Hyper-V there is only one type of virtual machine type. Starting with Hyper-V on Windows Server 2012 R2 Preview there are two types of virtual machines generations that can be selected when a new virtual machine is created.

  • Generation 1 – This virtual machine generation provides the same virtual hardware to the virtual machine as in previous versions of Hyper-V.
  • Generation 2 – This Virtual machine generation provides the following new functionality to a virtual machine:
      • Secure Boot (enabled by default)
      • Boot from a SCSI virtual hard drive
      • Boot from a SCSI virtual DVD drive
      • PXE boot using a standard network adapter
      • UEFI firmware support
      • IDE drives and legacy network adapter support has been removed

Requirements

The following guest operating systems are supported as generation 2 virtual machines.

  • Windows Server 2012
  • Windows Server 2012 R2 Preview
  • 64 bit versions of Windows 8
  • 64 bit versions of Windows 8.1 Preview

NOTE: Once a virtual machine has been created, you cannot change its generation.

Generation 2 Virtual Machine Features

PXE boot using a standard network adapter – In previous versions of Hyper-V if you wanted to perform a remote installation of the guest operating system via PXE boot, you were required to install a legacy network adapter for PXE boot in addition to the standard network adapter that you would use after the operating system was installed.

Generation 2 virtual machines support PXE boot using a standard network adapter, so there is no need to install a legacy network adapter. The legacy network adapter has been removed from generation 2 virtual machines.

Boot from SCSI controller – In previous versions of Hyper-V you could not boot a virtual machine from a SCSI attached virtual hard disk or DVD drive.

Generation 2 virtual machines can boot from a virtual hard disk or DVD drive that is attached to the SCSI controller. The virtual IDE controller has been removed from generation 2 virtual machines.

Secure Boot – Secure Boot is a feature that helps prevent unauthorized firmware, operating systems, or UEFI drivers (also known as Option ROMs) from running at boot time. Generation 2 virtual machines can take advantage of Secure Boot.

Note: Secure Boot is enabled by default for generation 2 virtual machines. This can be modified after the virtual machine has been created.

With this new generation 2 virtual machine there some caveats. You can run generation 1 and generation 2 side by side, but generation 2 does not support all of the Hyper-V supported guest operating systems. For operating systems that are not supported by generation 2 virtual machines, they will need to be installed in a generation 1 virtual machine.

Regarding performance, in the day to day running of a virtual machine there is no performance difference between a generation 1 and generation 2 virtual machines. However in the following two scenarios there is a performance improvement when using generation 2 virtual machines.

  1. Virtual machine operating system boot time can be up to 20% faster with generation 2 virtual machines.
  2. Installing the guest operating system can be up to 50% faster with generation 2 virtual machines.

The major benefits of using generation 2 virtual machine are virtual machine can boot off a SCSI device or a standard network adapter and helps prevent unauthorized firmware, operating systems, or UEFI drivers (also known as Option ROMs) from running at boot time when Secure Boot is enabled.

Cheers,


Marcos Nogueira
http://blog.marcosnogueira.org
Twitter: @mdnoga

Free E-Books of different Microsoft Technologies.

Today I found, completely by accident I might add, a collection of free E-Book of different Microsoft Technologies.

They cover from IT PRO to Developer subjects. These E-Books are available in multiple formats (EPUB, MOBI and PDF) and in some cases in different languages. You can find the all collection here. And I did understand that they will update the list in regular basis. So bookmark the page to receive always the news E-Books.

Here are the E-Books that I definitely recommend:

System Center

clip_image002 clip_image004

Windows Server

clip_image006 clip_image008 clip_image010 clip_image011

Career

clip_image013

Cheers,


Marcos Nogueira
http://blog.marcosnogueira.org
Twitter: @mdnoga